Thursday, December 3, 2009

Stimulus Jacket


At my favorite thrift shop there is a long row of quality jackets which do not seem to sell that well. When most of them survived the semiannual $10 a bag sale, I decided to take action. Using the forest green plaid jacket as the base, I found two jackets and a vest to echo the accent colors in the plaid. I cut off the bottom of the plaid jacket and replaced with the bottom of the red jacket. Red scraps embellish the lapels. The blue jacket provides inserts in the sleeves and accent triangles at the bottom. Plaid scraps embellish the blue. The back is cut off the vest, and the front pieces are sewn onto the top of the jacket. Four pieces are cut from the sweater, sewn together the long way, and serged around the edges to make a coordinating scarf.


This is the base starting jacket.


The bottom of this jacket replaced the bottom of the plaid jacket. Pieces of the red jacket embellished the lapels.


This jacket supplied embellishments for the bottom of the new jacket and for the middle of the sleeves.


This vest goes over the jacket.


This sweater cut into strips made the long scarf.


Tools and Materials

Three jackets about the same size
Vest large enough to fit over jacket
Sweater
Thread, scissors, pins, sewing machine

Saturday, November 28, 2009

Disco Ball Handbag

A disco ball gives a festive atmosphere to any space. I transferred the concept to a handbag. The result is fun but not for the shy and retiring.


Front

This is the bag I started with, a plain silver saddle bag style.


Tools and Materials


1 plain smooth surfaced handbag. Mine was plastic.
Large sequins in silver, black and multi-colors. I used Tree House Studio brand from the craft store.
All-purpose white glue
Super Glue

Technique

Glue the silver sequins on the handbag in rows. I avoided gluing over seams. On one side I randomly scattered black sequins, and on the other side I scattered colored sequins. The glue dries clear, so it can be spread thickly on the handbag. I used the white glue on the flatter middle area and the Super Glue on the edges. Any glue showing on the sequins can be wiped off or scraped off after it dries using a kitchen sponge with a scrubby on one side. Glue one side, let it dry, and then glue the other side. This handbag looks better the fuller it is, more like a disco ball.

Back

Sunday, November 15, 2009

Playing with Houndstooth

A black and white houndstooth weave jacket was the inspiration for playing with the houndstooth design on the plain turquoise silk sheath.

To make the jacket a bit more playful, I removed the velvet color and slip stitched closed the neckline fabric. The jacket was cut off and refinished below the bust in front dipping down to just below the waistline in back to make more of a caplet. The lapels were closed in front with two buttonholes and two shell buttons added.

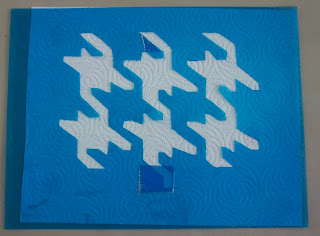
The sheath was shortened to knee length and spray painted with silver paint in an enlarged houndstooth design. The back of the stencil was sprayed with tack adhesive so that it would lie very flat on the fabric.
The Web site www.thescottishweaver.com has examples of several different types of houndstooth weaves. The one in the jacket is called Turnberry, so I enlarged and printed out a sample of that design. I used the enlargement as the template for cutting the stencil.


Tools and MaterialsDress
Jacket
Two buttons
Stencil paper
Heavy duty craft knife
Spray paint
Spray tack adhesive
Transparent tape
Sewing machine

Tips


Shake the spray paint and clean the nozzle frequently.

Wipe the stencil off front and back before each use.

Mask areas around the stencil so that overspray does not ruin the design.

Wednesday, November 11, 2009

Tattooed Handbag


Temporary tattoos are colorful, inexpensive and very popular for children’s parties. Grouping them makes a bigger statement than single tattoos. Why not use them to embellish a plain handbag?


What I Used:
1 plain smooth surfaced handbag. Mine was plastic. I do not know how this technique would work on leather or cloth.

Assorted temporary tattoos. I purchased the smaller tattoos (approx. 2”x2”) at a party goods store. I found some larger ones (approx 2”x4”) in a vending machine at a local restaurant.

Clear acrylic matte spray. I used Blair brand.

Washcloth or sponge

Weight, like a rock from the garden

Technique:
Decide on a shape for the tattoo group that complements the shape of the handbag. Anchor the design with the larger tattoos. Then fill in the shape with the smaller tattoos. Some of the smaller tattoos have more than one design and can be cut up to fill in small spaces.
Follow the instructions that come with the tattoos to attach them to the handbag. In short, remove the protective cover on the tattoo. Place it face down in the desired position. Moisten the washcloth or sponge and put it over the tattoo. Weight it with a rock for about 30 seconds. Remove the rock, the cloth or sponge, and the tattoo backing. Let dry.
Spray the handbag with the acrylic matte coating, let dry, and spray again.

Monday, November 9, 2009

Soft, Feminine, Victorian Inspired Outfit


Sheath before


The plain but pretty silk sheath started my creative thinking. Remove the cutwork decoration from a satin slip and sew behind the scoop neck. This picks up the peach color. Remove the lace from the bottom of the slip and sew it to the lining of the dress so that it hangs about 1” below the dress hem. This picks up the cream color.


Lingerie before


The baby doll top had a slit up the middle, which I sewed closed. I put snaps at the shoulders to hold the top in place on the dress. The dress and lacy top were included in the Spring 2008 issue of Altered Couture magazine.


Shrug before

The rose shrug was made from a long-sleeved silk pajama top. Cut off the sleeves to short sleeve length, about 7” from the top of the shoulder, and finish the cut edge with edging lace. Cut off the collar and front button and buttonhole plackets. There was a pocket, which I removed very carefully. Cut off the bottom so that the shrug fits comfortably under the bust. From the bottom piece cut two ties 4” wide and about 18” long. Sew these to the front of the shrug at the bottom so they can be tied together. Sew edging lace all around the neckline, ties and bottom of the shrug.

I found two lacy rose decorations on sale in the bridal department of the fabric store, but they were bright white. To make them blend with the creamy shades in the outfit, I made some strong tea with hot water in a bowl and dipped in the roses. Perfect!

Sew the rose decorations on the shrug near the shoulders using a zigzag stitch. With the small sharp scissors cut away the fabric from behind the roses for a sheer look.

Belt
The cream, peach and rose colors reappear in the braided belt. Cut 3” wide strips from the three fabrics with a length of waist size, plus 36”, for each strip color, piecing as needed. Sew a seam along the length of each strip and turn to form tubes. Hold the three strips together 18” from one end and sew through all three to anchor them. Then braid the strips to the waist size. Sew the three strips together again. Trim the tubing tassels to the same length on each side. Slip two beads onto each tube, and knot below the beads to hold them on.


Saturday, November 7, 2009

Two-piece Winter Outfit


A coat, vest and sweater are usually layered for winter, but I decided to combine them into one outfit. This was a fairly quick transformation, about two hours. I removed the sleeves from the coat, trying not to get the down all over the house. I was partially successful, and now I have a bag of down for some future project. I cut off the last cylinder of down from each sleeve and replaced them with the lower part of the sweater sleeves. I sewed the sleeves to the vest. I used the body of the sweater for the skirt, adding waistband elastic for the waist. A camisole is used under the top. Now I need to think of some sleeves to add to the coat, from a bulky sweater, perhaps.

The sweater body was made into the skirt, the sleeves were sewn to the down sleeves.


The beaded vest had sleeves from the coat and sweater sewn on.

Wednesday, November 4, 2009

Bee Couture


This is a cozy bee blanket I made from a contractor trash bag and R19 insulation.


This is how it is wrapped around the top bar hive and secured with a bungee cord. I also stuffed some insulation into the back of the hive where there was a gap, and I put in a small hole for the entrance instead of the long slit.


There's never a dull moment around here with the hot air balloons and parachute jumpers.